

In the last few posts, I was telling the story about my search for a better levain sourdough bread. And my journey to find four ways to improve a good sourdough bread and make it a really good bread. In this last post of the series, I’ll describe my current loaf process from start to finish.
This recipe is for a 100% pure Levain Country Bread, with a slow and long proofing. Once you have yourself an active starter, you only need these 3 other ingredients for this recipe: flour, water, and salt. Also, I like to think of temperature and time as crucial ingredients in this process.
If you don’t have that much time, and still want to make some awesome sourdough bread, try a hybrid sourdough recipe, where a tiny bit of bakers’ yeast help get things going quicker without compromising too much with the flavor.
To read more about how to grow your own active starter, the techniques used in this process, and more detailed recipes, get this book: Flour, water, yeast, salt by Ken Forkish (affiliate link).
Post Content
Day 1
9 AM – Feeding the starter
Feeding the starter basically means you get rid of most of it, keep just about 100 grams, and “feed” with some fresh flour and water: 200 gr white flour, 50 gr whole wheat flour, and 200 grams water at 85F-90F (29C-32C). Mix and let rest at room temperature.

Day 2
10 AM – Feeding the starter again:
About 24 hours after the last feed, feed the starter again, using a slightly warmer water temperature (32-35 C). This way, the starter will be at its peak activeness in time for mixing the dough.
5 PM – Autolyze:
About 7 hours after the starter was fed, mixing the flour and water and letting it rest for 20-30 minutes to let the flour absorb the moister before adding any salt. The mix of flours I’m using is 20% whole wheat, 70% white bread flour, and 10% rye flour. I do mix it up a little bit from time to time. Water is measured as 78% hydration (very wet dough!).


5:30 PM – Mixing the final dough:
Adding salt and starter to the flours and water mix. Kneading the dough well, making sure the salt and starter had all integrated into the flour. Forming a tight ball and covering with a plastic bag. This is when the first proofing starts and continues for a slow 15 hours at room temperature.


6:30 PM, 7 PM, 7:30 PM, 10 PM – Folding the dough:
The dough needs to be folded 3-4 times to strengthen the gluten so that it will be able to support its own weight when rising in the baking process. To fold, I’m stretching out a piece of dough from the dough’s rim and then bringing it back into the center, and repeating all around the dough until a tight ball is formed again.


Day 3
9 AM – Shaping
About 15 hours after mixing the final dough, it’s ready to be shaped and placed into the proofing baskets for the second proofing. To do that, I flour the baskets and a working surface and gently transfer the risen dough to the surface. Cutting it in the middle to form two loaves. Each half is shaped into a ball and then placed crease down in the basket.


12:30 PM – Preheat
About an hour before proofing is done, I turn on the oven to 475F, with the Dutch ovens inside.


1:15 PM – Placing loaves in the oven
Gently flipping and releasing the loaf to a floured work surface, scoring the loaves with a razor is unnecessary because we flip it so that the crease is up again, but I do score the oval loaf. From there to the Dutch oven, cover with the lid and into the oven. Doing the same for the second loaf.


1:30 PM – Baking covered
For the first 30 minutes of the baking process, baking in the covered pots and avoiding opening the oven.

2 PM – Baking uncovered
Removing the lids and baking for another 15-30 minutes until dark brown (checking every 5 minutes after the first 15).


2:30 PM – Resting
Releasing loaves from the Dutch oven and placing them on a metal griddle where air flow can reach the bottom of the bread. Letting the bread rest for 1 hour.

3:30 PM Loaves finally ready
About 54 hours (!) after starting the process, the fresh levain sourdough loaves are ready to be eaten. They can be sliced and eaten right then and there or kept at room temperature for another couple of days.


Overnight Pure Levain Country Bread
This is an adapted version of the amazing country bread recipe by Ken Forkish from his book. I really suggest you buy his book because his recipes are so detailed and well written and you'll find the whole book super useful if you're serious about making artisanal bread.
Ingredients
For the Starter:
- 50 g Active levain starter
- 200 g White flour
- 50 g Whole wheat flour
- 200 g water
For the final dough:
- 804 g White flour
- 26 g Whole wheat flour
- 50 g Rye flour
- 684 g Water
- 22 g fine sea salt
- 216 g Levain starter
Instructions
- Feed the Levain: 24 hours after the last feed, feed the starter again by discarding all but 100 gr of starter and mixing in 200 g white flour, 50 g whole wheat flour, and 200 g water 85F-90F (29C-32C). Mix until incorporated and let rest in room temp for 7-9 hours (to make sure the starter is in its peak activeness, it should double in volume during this time).
- Autolease: After 7-9 hours, mix the white, whole wheat, and rye flour by hand in a big bowl and add the warm water at 90F-95F (32C-35C). Mix by hand until just incorporated and let rest for 20-30 minutes.
- Mix the final dough: sprinkle the salt evenly on the surface of the flour and water mixture. Top with 216 g of the levain starter from step 1. I put the whole bowl on a scale and pour the starter carefully with a spoon's help until the right amount is measured, but you can also use wet fingers to transfer it. Use a wet hand to mix the dough, pinching and folding until the ingredients are well incorporated, and the dough reaches a goal temperature of 77F-78F (25C-26C).
- Fold: this dough needs 3-4 folds during its bulk fermentation. You can time these folds whenever is convenient within your schedule. For example, 2 folds during the first hour and another two during the 2nd hour. To fold, stretch out a piece of dough from the dough's rim and then bring it back into the center, repeating all around the dough until a tight ball is formed again.
- Divide: 12-15 hours after mixing the final dough, it is ready to be divided. With floured hands, gently ease the dough into a floured surface. Cut the dough into 2 even parts using a plastic scraper.
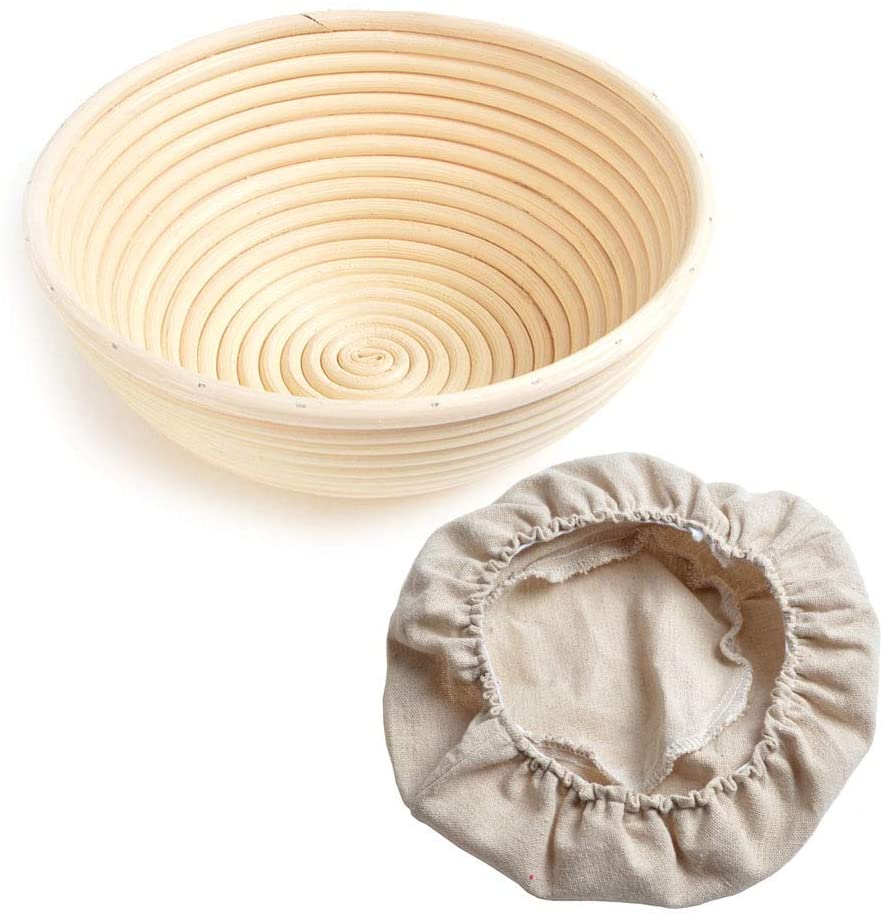
- Shape the dough: dust two proofing baskets with flour. Shape each dough piece into a medium tight ball and place seam down into the basket.
- Proof: cover the baskets with a kitchen towel or plastic bag and proof at room temperature for about 4 hours. If it's cold outside, give some extra time and check for readiness by denting your finger in the dough about half-inch in. If the dough springs back quickly, it needs some extra time. If it takes longer and doesn't spring back all the way, it's ready to bake.
- Preheat: at least 45 minutes before baking, preheat the oven to 475F (245C) and prewarm the Dutch ovens in a middle rack.
- Bake: Using oven mittens, take each Dutch oven out of the oven one at a time, remove the lid, and flour the bottom of the pot generously. Invert the dough into a floured surface and carefully place it inside the hot dutch oven, making sure the seam side is up. Put the lid back on and replace it in the oven, then repeat with the second loaf. Bake covered for 30 minutes, making sure not to open the oven, then remove the lids and bake for an additional 15-30 minutes until a dark brown hue all around the loaves, checking every 5 minutes after 15 minutes. Remove the Dutch ovens from the oven and release the loaves. Let them rest for at least 20 minutes before slicing.
Notes
More about how to improve your hard-work bread in four simple steps, read the previous post.
Recommended Products
As an Amazon Associate and member of other affiliate programs, I earn from qualifying purchases.


Slicing the sourdough loaves
It’s not so simple to slice that tough crust but soft inside loaf. I like to slice the bread into chunky and wide half-slices. To do that, I start by splitting the bread into two halves right in the middle, then flipping every half on top of the leveled side and slice from there – it’s a lot easier to get a good grip on the cutting board.
Freezing sliced loaves
If I don’t use the bread that same day, I slice it all, put it in a zip lock bag and freeze it. That way, I can always release a few slices with a sharp knife and toast them while still frozen. The result is great!


Different Uses For Sourdough Bread
You can use your well-earned sourdough bread for any bread-use you can think of. Here are some examples:


Conclusion
To sum up, it takes a lot of time and patience to make great tasting bread, but every step is quite simple and straightforward. It also takes multiple trials and errors to get the recipe exactly right for your oven, equipment, and room temperature. I hope this guide made you consider starting your own active starter. And if not, maybe just a craving for a decent slice of bread.

